Tagging Bitbucket repositories with AppVeyor
Forgetting to tag on release?
Who hasn’t forgot to tag their repository after doing a build and pushing it live? There’s even git extensions that do all the hard work for us too, take git flow for example on a git flow release publish {RELEASE} it will create you a tag with your given version number. The only problem with git flow is it doesn’t automatically push the tags to remote repositories so you have to manually call git push --tags - Now how many times have you forgot to do that?
Continuous Integration Solution
Most mature continuous integration solutions come with a baked in solution for tagging your repository on a successful build.
The two that come to mind are CruiseControl.NET whereby you set a flag in your sourcecontrol XML block in the configuration:
<sourcecontrol type="git">
  <repository>git://github.com/kevbite/kevbite.github.io.git</repository>
  <!-- Snips -->
  <tagOnSuccess>true</tagOnSuccess>
  <!-- Snips -->
</sourcecontrol>
and then there is TeamCity, they allow you to tag the repository (VSC Labeling in the JetBrains lingo) by setting up Labeling Rules:
Labeling pattern: %system.build.number%
Label builds in branches: +:*
But what about this shiny new AppVeyor?
So I’ve got a new toy, yes AppVeyor… Now there’s no option within AppVeyor to automatically create tags within your repository on a successful build. What I also noticed was that AppVeyor only has read only access to the Bitbucket via the Bitbucket Deployment keys. Deployment keys are useful for authenticating a build server to checkout and test your code.
So what can we do?
AppVeyor has a nice pluggable pipeline where you can add in your own custom scripts at any point within the build process, one of the points is on success this is called on every successful build, and can be configured within the appveyor.yml file:
on_success:
  - ps : .\tag-repository.ps1
Now we know how to call a custom script once we’ve had a successful build, now we just need a script. Since AppVeyor only has read access by default to our repositories we need to setup a user and password within the git configuration, then assign a new remote repository with that user. This allows us to push back the tags to a remote repository. Now we can tag the repository normally with a git tag {version} {commit-hash} then push it back up to our remote repository that we’ve just added.
Below is the tag-repository.ps1 for this, it might look a bit confusing to start off with the amount of environment variables being used.
git config --global user.email "$($env:GitEmail)"
git config --global user.name "$($env:GitUsername)"
git config --global credential.helper store

Add-Content "$env:USERPROFILE\.git-credentials" "https://$($env:GitUsername):$($env:GitPassword)@bitbucket.org`n"

git remote add bitbucket https://$($env:GitUsername)@bitbucket.org/$($env:APPVEYOR_REPO_NAME).git
git tag $($env:appveyor_build_version) $($env:APPVEYOR_REPO_COMMIT)
git push bitbucket --tags --quiet
So we’ve used a lot of environment variables within our script, most of these are just the standard set of environment variables that AppVeyor build agent gives us, these can be found here. There is also a few of our own:
- GitEmail
- GitUsername
- GitPassword
We’ve pulled out these variables so we can re-use this script, plus we don’t really want to be storing passwords in plain text within our repository.
So we just need to inject our custom environment variables in to our build script, we can do this two ways.
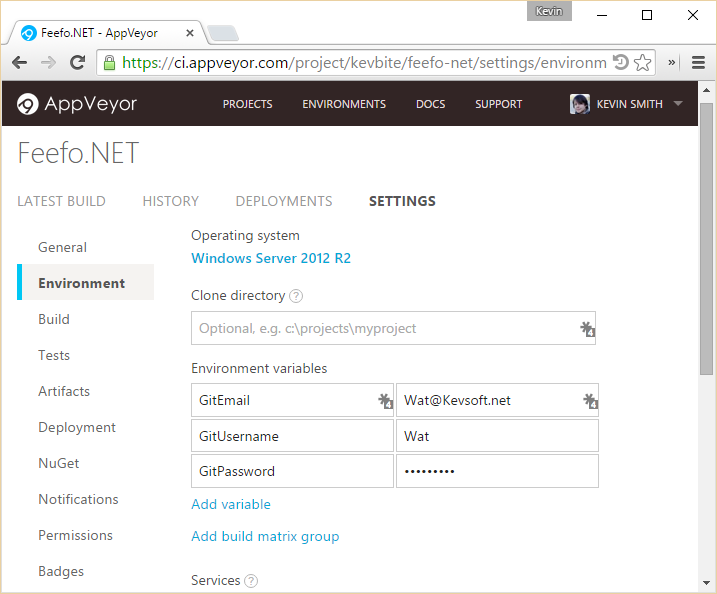
The first way is by configuring the environment variables within the AppVeyor portal, to navigate here go to a project then Setting -> Environment. Here you will see an option to add environment variables, then we can add the 3 custom environment variables above:

The second option which I personally prefer is to setup the environment variables within the appveyor.yml file:
  environment:
    GitEmail: [email protected]
    GitUsername: Wat
    GitPassword:
      secure: 5rlMt+A20EhYaLPQFygpIA==
As you can see these can include encrypted variables which can be generated here, you can also read about how they work on the build configuration page.
Once we’ve sorted all that we’ll have our build server automatically tagging our repositories!
Caveats?
Even though we have a nice automated solution, there is a little caveat to this approach. In this approach we have to create a read/write access user within Bitbucket and due to Bitbucket is a per user licensing model this will use up one of our Bitbucket users! Doh! You could always just use your personal account but if you’re working within a team I wouldn’t advise it.