Semantic Search with MongoDB and .NET
I recently did a lightning talk at dotnetsheff on semantic search with MongoDB, and this is the follow-up blog post I promised. If you were there, this is the written version you can read back through at your own pace. If you were not, do not worry, everything you need is here and it reads as a standalone post.
The big idea is a simple one. For years, search has meant keyword matching. You type a word, the database looks for that exact word, and if you happen to use a different word than the author did, you get nothing back. Semantic search flips that around so that we search by meaning, not by keywords.
Let’s dig into what that means, how it works, and how you can build it yourself with MongoDB and .NET.
What is semantic search?
If you remember one thing from this whole post, make it this sentence. Search by meaning, not by keywords.
Keyword search asks a very literal question. Do these exact words appear in the document, yes or no. Semantic search asks a smarter question. Is this document actually about the same thing the user is asking for.
Here is the example I kept coming back to in the talk. Imagine you search for a film about “a young wizard who must defeat a dark lord”. The perfect answers are the Harry Potter films. But their descriptions talk about Harry, Hogwarts and Voldemort. They might never use the phrase “young wizard defeats a dark lord”. So keyword search struggles, while semantic search finds them instantly, because it understands the concept behind the words.
Why keyword search falls short
Let me be fair to keyword search first. It is fast, it is simple, and it is perfect when you know the exact term you want, like a product code, an order number, or a username. But it breaks down in a few very common ways.
- It only matches literal words. If a film description says “sorcerer” and you search for “wizard”, you can get nothing back, even though the two words mean the same thing.
- It has no real sense of intent. A long, natural question gets chopped into separate words and ranked mostly by how often those words appear, not by what you actually meant.
- To paper over this, you end up hand maintaining synonym lists and clever matching rules, and they never quite cover every case your users come up with.
So keyword search is a genuinely useful tool, but at the end of the day it is matching letters, not meaning.
But keyword search can be cleverer than that
Now, to be fair, plain exact matching is not the end of the story. Databases and search engines have picked up a whole bag of tricks over the years to paper over the cracks, and MongoDB is no exception. It is worth knowing what these are, because they genuinely help, right up until the point where they do not.
- Stemming and lemmatisation. Chop words back to their root so that “running”, “runs” and “ran” all match “run”. MongoDB’s text indexes do this for you with language aware stemming.
- Fuzzy matching and edit distance. Allow a word to match even if a few characters are off, using something like Levenshtein distance. Atlas Search exposes this directly with a
fuzzyoption, and Elasticsearch has had it for years, so “wizrd” can still find “wizard”. - Synonyms. Hand maintain a list that says “wizard”, “sorcerer” and “mage” are the same thing. Atlas Search supports synonym collections, and most search engines have some form of this.
- N-grams and autocomplete. Index chunks of words or characters so partial and type-ahead matches work, which is what powers most search-as-you-type boxes.
- Phonetic matching. Algorithms like Soundex or Metaphone match words that sound alike, so “Smith” and “Smyth” land together.
These are all real, useful tools, and if you are on MongoDB you can reach for a lot of them through a text index or Atlas Search without adding anything new to your stack.
But here is the catch. Every one of these is still working at the level of characters and tokens, not meaning. They make the literal matching more forgiving, but they never actually understand what you asked for. Fuzzy matching is a good example, it is tuned around edit distance, so it happily corrects “wizrd” to “wizard”, yet a perfectly ordinary typo like “wixard” can slip straight past its threshold, and something like “mage” will never fuzzy match “wizard” at all because the letters are completely different despite the meaning being identical. Synonym lists only cover the synonyms you remembered to add. Stemming does nothing for two words that share a meaning but not a root.
So no matter how clever we get, keyword search is still literal. It has no sense of context or intent. That is exactly the gap semantic search fills.
Semantic search takes a different approach. Instead of comparing words, we compare meaning. Synonyms simply work out of the box, “wizard”, “sorcerer” and “mage” all end up in a similar place with no synonym list required. It also copes well with paraphrases, with small typos, and even with different languages, because all of those still carry the same underlying meaning.
The two ingredients that make this possible are embeddings and vector search, so let’s look at those next.
Embeddings 101
An embedding is simply a list of numbers that represents a piece of text. You feed text into a model, and it hands you back a fixed length list of numbers. That list is called a vector.
The clever part is what those numbers mean. The model has been trained so that texts with similar meaning produce similar numbers, and texts with very different meaning produce very different numbers. So you can think of an embedding as a kind of fingerprint for the meaning of the text.
In the demo I ran, every piece of text becomes a list of 768 numbers, generated by a model called nomic-embed-text. That model runs entirely on my laptop using Ollama, so there are no API keys and nothing leaves the machine, which is great for privacy and very handy on conference wifi.
Vectors and similarity
So we have turned every document into a vector, which is really just a point in space. The question now is how we actually search through them.
Picture each document as a single dot. If a vector only had two or three numbers, we could plot it on a simple graph. Our vectors have 768 numbers, so it is a 768 dimensional space. We cannot picture that in our heads, but the computer handles it very easily.
To find matches, we measure how close two points are to each other. The most common measure for text is cosine similarity, which looks at the angle between two vectors. A small angle means the two meanings are pointing in almost the same direction, so they are very similar. A large angle means they are pretty much unrelated.
So a search boils down to this. Embed the query into the same space, then find the nearest points to it. Those nearest neighbours are your best results.
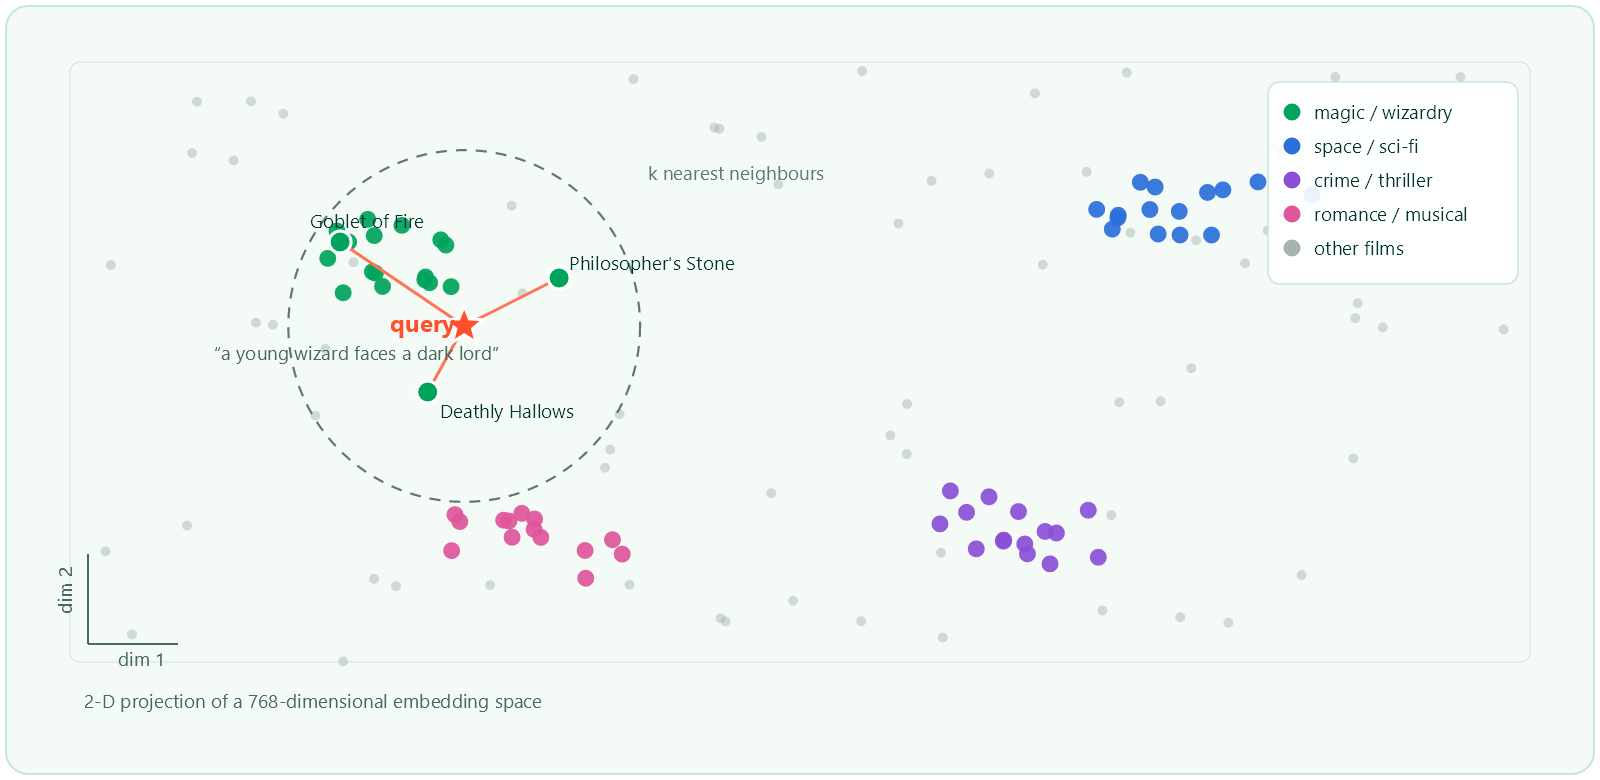
Every film has been embedded and placed as a point in this space. Notice how films about the same theme naturally group together into clusters. Now we take the user query, “a young wizard faces a dark lord”, and we embed it in exactly the same way. That is the red star. It lands right next to the wizardry cluster, even though it shares no keywords at all with those film descriptions. To answer the search, we simply grab the nearest points to that star.
One honest caveat. Real embeddings are 768 dimensional, and this picture is a flattened, two dimensional version so that it fits on a slide. But the underlying idea, that closest points means closest meaning, is exactly what the database is doing for us.
Where MongoDB fits in
Everything I have said so far is generic. It applies to any embedding model and any database. So where does MongoDB come in?
The key thing is that you do not need to bolt on a separate, specialised vector database just to do this. MongoDB can store your normal data and the embedding vectors together, in the same document, and then search across them together. One database, not two.
Atlas Vector Search adds two things to the MongoDB you may already know. The first is a new kind of index that understands vectors, which is what lets it find nearest neighbours quickly even across millions of documents. The second is a $vectorSearch aggregation stage that you drop straight into a normal aggregation pipeline.
Here is what actually lands in the database for a single film:
{
  "_id": ObjectId("6520f1a3c3a4b2e1d8f90a12"),
  "Title": "Harry Potter and the Philosopher's Stone",
  "Genre": "Fantasy",
  "Description": "An orphaned boy learns on his eleventh birthday that he is a wizard and is whisked away to Hogwarts School of Witchcraft and Wizardry...",
  "Embedding": [0.021, -0.044, 0.118, -0.007]
}
It has the everyday fields you would expect, a title, a genre and a description. The important part is the last field, Embedding. That is the 768 number vector we generated from the description (I have only shown the first few numbers here). The vector sits right alongside the normal data, on the very same document. There is no separate vector database and no second system to keep in sync.
Mapping out the two pipelines
Before we touch any code, it is worth mapping out the flow, because there are really only two pipelines to build and everything else hangs off them.
The first is the ingest and indexing pipeline, which we run once to get our data into the database ready to be searched:
- Take each movie and build a piece of text from its title and description.
- Send that text to Ollama and get back a 768 number embedding.
- Store the movie together with its embedding in MongoDB.
- Create the Atlas vector search index over the embedding field.
The second is the query pipeline, which we run every time a user searches:
- Take the user’s query text.
- Send that text to Ollama and get back an embedding, using the exact same model.
- Run a
$vectorSearchto find the nearest movie vectors to the query vector. - Return the ranked results, along with a similarity score.
Notice that both pipelines call the same embedding model. That is important, the query and the documents have to live in the same vector space for the distances to mean anything. Keep those two flows in your head and the code below will fall into place.
Setting up the infrastructure with Docker
The demo needs two things running, MongoDB and Ollama. Rather than install either of them by hand, I wired both up in a docker-compose.yml so the whole thing comes up with one command:
services:
  mongo:
    image: mongodb/mongodb-atlas-local
    container_name: semantic_mongo
    ports:
      - "27017:27017"
    volumes:
      - atlas_data:/data/db

  ollama:
    image: ollama/ollama:latest
    container_name: semantic_ollama
    ports:
      - "11434:11434"
    volumes:
      - ollama_data:/root/.ollama

  # One-shot init: waits for Ollama, then pulls the embedding model so the app
  # doesn't 404 on /api/embeddings the first time it runs on a fresh machine.
  ollama-pull:
    image: ollama/ollama:latest
    container_name: semantic_ollama_pull
    depends_on:
      - ollama
    environment:
      OLLAMA_HOST: "http://ollama:11434"
    entrypoint: >
      sh -c "until ollama list >/dev/null 2>&1; do echo 'waiting for ollama...'; sleep 1; done;
             ollama pull nomic-embed-text"
    restart: "no"

volumes:
  atlas_data:
  ollama_data:
There is a bit going on here, so let’s walk through each service.
The mongo service uses the mongodb/mongodb-atlas-local image. This matters, because vector search is an Atlas feature and a plain standalone MongoDB will not do it. This image gives us the full Atlas Vector Search experience running inside a container, with no cloud account required. It exposes the usual 27017 port so the app can connect to it just like any other MongoDB.
The ollama service runs Ollama itself, which is what actually hosts our embedding model. It listens on port 11434, which is Ollama’s default, and we give it a volume so the downloaded models survive a restart.
The third service, ollama-pull, is the one that is easy to overlook but saves a lot of pain. When Ollama first starts, it does not have any models yet. If our app fired off an embedding request straight away it would get a 404 back from /api/embeddings, because nomic-embed-text has not been downloaded. So this one-shot container waits in a loop until Ollama is responding, then runs ollama pull nomic-embed-text to fetch the model. Once the model is pulled it exits and stays exited, which is what restart: "no" is for.
Starting the lot is a single command:
docker compose up
Give it a moment on the first run while it pulls the images and downloads the model, and after that you have MongoDB Atlas Local and Ollama both ready to go.
Generating embeddings in C#
Now to the app itself. It is a small C# console application, and its only real job is to embed some text and talk to MongoDB. Let’s start with the embedding step, because it is the heart of everything.
Here is the whole EmbeddingService:
using System.Net.Http.Json;
using System.Text.Json.Serialization;

class EmbeddingService
{
    private readonly HttpClient _http;
    private readonly string _model;

    public EmbeddingService(string baseUrl = "http://localhost:11434", string model = "nomic-embed-text")
    {
        _http = new HttpClient { BaseAddress = new Uri(baseUrl) };
        _model = model;
    }

    public async Task<float[]> GenerateAsync(string text)
    {
        var response = await _http.PostAsJsonAsync("/api/embeddings", new { model = _model, prompt = text });
        response.EnsureSuccessStatusCode();
        var result = await response.Content.ReadFromJsonAsync<EmbedResponse>();
        return result!.Embedding;
    }

    private record EmbedResponse([property: JsonPropertyName("embedding")] float[] Embedding);
}
There is deliberately not much to it. In the constructor we create an HttpClient pointed at the local Ollama endpoint on port 11434, and we remember which model we want to use.
The real work is in GenerateAsync. We POST to Ollama’s /api/embeddings endpoint with just two things, the name of the model and the text we want to embed. Ollama runs the text through the model and hands us back a JSON object with an embedding array on it. We map that onto the little EmbedResponse record, using JsonPropertyName so the lowercase embedding from Ollama binds to our Embedding property, and return the float[].
That array is our 768 dimensional embedding, and that is genuinely all it takes to turn text into a vector. The nice thing here is that if you have ever called a REST API, you already know how to generate embeddings. There is nothing exotic going on.
Modelling and storing the data
Each film is a plain C# class:
[BsonIgnoreExtraElements]
class Movie
{
    [BsonId]
    public ObjectId Id { get; set; } = ObjectId.GenerateNewId();
    public string Title { get; set; } = "";
    public string Description { get; set; } = "";
    public string Genre { get; set; } = "";
    public float[] Embedding { get; set; } = [];
}
It is the everyday fields plus one extra, Embedding, which is where that float[] from Ollama gets stored. Because it is just a normal property, the MongoDB driver serializes it straight into the document with everything else, which is exactly the “data and vector living together” idea from earlier.
Seeding is then a matter of embedding each movie’s text and inserting the lot:
if (!await repo.IsSeededAsync())
{
    Console.WriteLine($"First run: generating embeddings for {movies.Length} movies...");
    for (int i = 0; i < movies.Length; i++)
    {
        movies[i].Embedding = await embedder.GenerateAsync($"{movies[i].Title}. {movies[i].Description}");
    }
    await repo.SeedAsync(movies);
}
We only do this on the first run, guarded by IsSeededAsync so we do not re-embed every time the app starts. For each movie we build a small piece of text from its title and description, embed it with the EmbeddingService we just looked at, and stash the result on the Embedding property. Then SeedAsync does a single InsertManyAsync to push them all into MongoDB. That is steps one to three of the ingest pipeline done.
Creating the vector index
Storing the vectors is not enough on its own. For MongoDB to search them quickly we need to tell it about the embedding field with a vector search index:
public async Task EnsureVectorIndexAsync(int numDimensions = 768)
{
    var indexDef = new BsonDocument("fields", new BsonArray
    {
        new BsonDocument
        {
            { "type", "vector" },
            { "path", "Embedding" },
            { "numDimensions", numDimensions },
            { "similarity", "cosine" }
        }
    });

    await _collection.SearchIndexes.CreateOneAsync(
        new CreateSearchIndexModel("vector_index", SearchIndexType.VectorSearch, indexDef));

    // ...then poll until the index reports queryable
}
The index definition is where we describe the vector to MongoDB. We point path at our Embedding field, tell it there are 768 dimensions (which has to match whatever the model produces), and pick cosine as the similarity function, which is a safe default for text embeddings. We then hand that to CreateOneAsync with the SearchIndexType.VectorSearch type and a name, vector_index, that we will refer to at query time.
One thing worth calling out is that the index is not ready the instant you create it. In the full code we poll the index list until it reports itself as queryable before we start searching, otherwise the first query could run against an index that is still building. That is step four of the ingest pipeline, and with it done our data is in the database and searchable.
Querying the vectors
Now the fun half, the query pipeline. Here is the search:
public async Task<List<MovieSearchResult>> SearchAsync(float[] queryEmbedding, int limit = 5)
{
    var options = new VectorSearchOptions<Movie>
    {
        IndexName = "vector_index",
        NumberOfCandidates = Math.Max(50, limit * 10)
    };

    return await _collection.Aggregate()
        .VectorSearch(
            field: x => x.Embedding,      // The vector field in your document
            queryVector: queryEmbedding,  // Your query vector coordinates
            limit: limit,                 // Number of top matches to return
            options: options)
        .AppendStage<MovieSearchResult>(new BsonDocument("$addFields",
            new BsonDocument("Score", new BsonDocument("$meta", "vectorSearchScore"))))
        .ToListAsync();
}
This is a normal aggregation pipeline, but using the driver’s strongly typed VectorSearch stage so there is no hand assembled BSON. We give it the field that holds the embedding, expressed as a simple lambda x => x.Embedding, the query vector, which is just the embedding of whatever the user typed, and a limit for how many results we want back.
It is worth pausing on limit and NumberOfCandidates, because they sound similar but do very different jobs. limit is simply how many results you get back at the end, so limit: 5 means “give me the top five”. NumberOfCandidates is how many documents MongoDB pulls into consideration during the approximate search before it ranks them and trims down to your limit. Remember that vector search is approximate, it does not exhaustively compare your query against every single document, because that would be slow at scale. Instead it gathers a pool of likely candidates and ranks those. So if you ask for limit: 5 with NumberOfCandidates: 100, MongoDB finds around a hundred promising documents, ranks them properly, and returns the best five. A bigger candidate pool means more accurate results because there is less chance of missing a good match, but it costs a little more work per query, so you are trading speed for recall. A common rule of thumb is to set candidates to ten or twenty times your limit, which is exactly what Math.Max(50, limit * 10) is doing here.
The final AppendStage pulls the similarity score out. MongoDB exposes it through $meta: "vectorSearchScore", and we copy it onto a Score field on a small MovieSearchResult type so we can show how strong each match was. Because the whole thing is type safe against our Movie class, the compiler checks the field name for us, and it reads almost like plain English.
The calling code ties the query pipeline together:
var queryEmbedding = await embedder.GenerateAsync(query);
var results = await repo.SearchAsync(queryEmbedding);
We embed the user’s query text with the same EmbeddingService, then hand that vector to SearchAsync. That is the whole query pipeline in two lines.
Running it
On the first run the app seeds the films, generates all of their embeddings, builds the index, and then drops into an interactive prompt where you can just type queries. Here is the kind of thing you get back:
- “a young wizard faces a dark lord” brings back the Harry Potter films
- “a hidden school for magic” surfaces the Philosopher’s Stone and Chamber of Secrets
- “friends fight a rising evil” leans towards the darker, later films
The thing to notice is that none of those exact words appear in the film descriptions, yet the meaning still matches. That is the whole point landing in practice.
Letting Atlas do the embedding with Voyage AI
In the demo so far, notice that I had to run and manage an embedding model myself with Ollama. That is perfectly fine, but it is one more moving part to look after. MongoDB now offers a way to remove that part entirely.
MongoDB acquired a company called Voyage AI, who build high quality embedding models, and those models are now available directly inside Atlas. This gives us automated embeddings. Instead of embedding text yourself, you let Atlas do it for you, on write and on query.
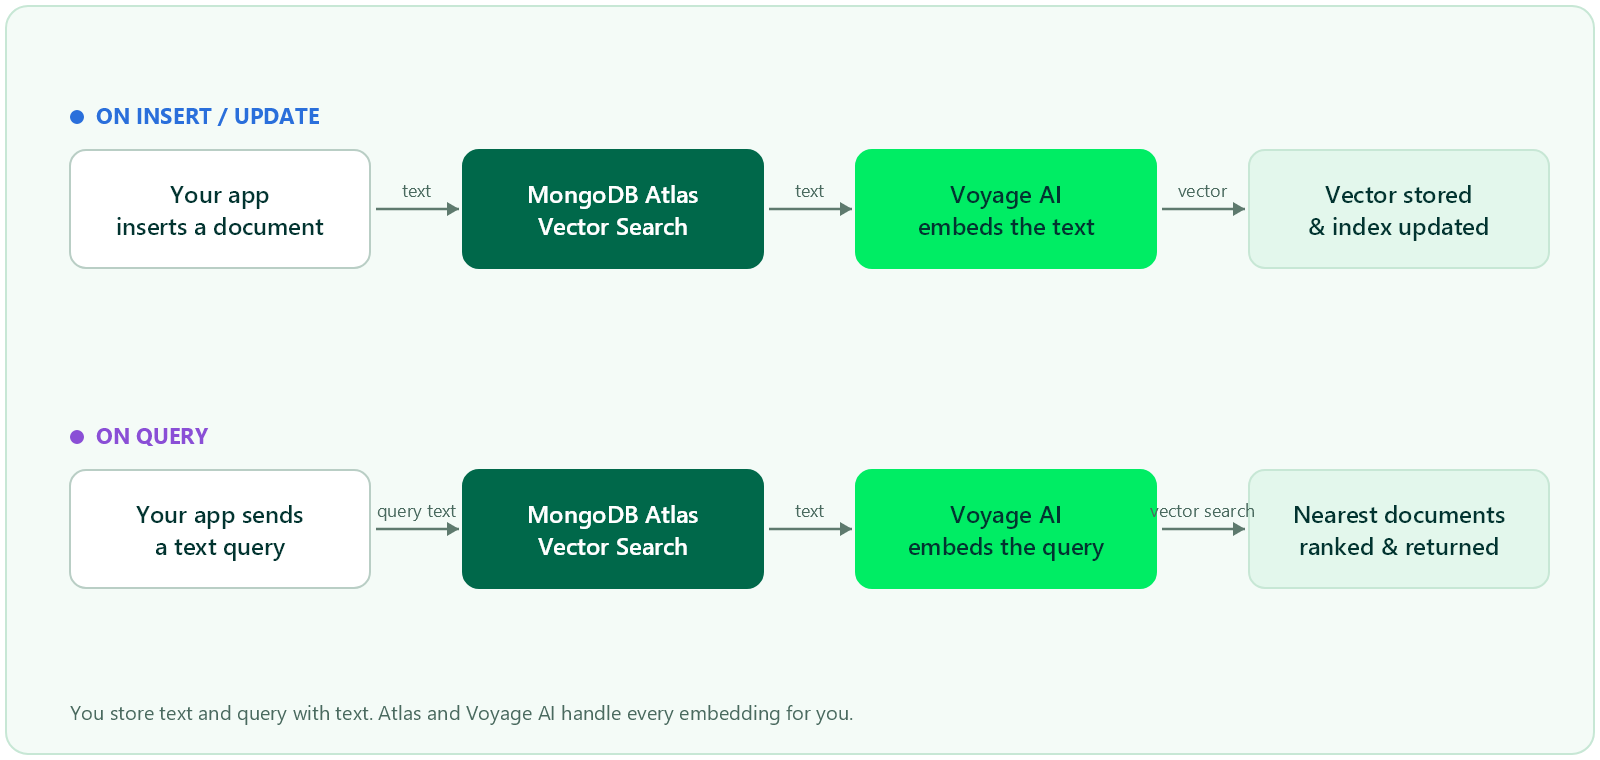
There are two flows here. On write, whenever your app inserts or updates a document, Atlas takes the text from the field you marked for automated embedding, sends it to the Voyage AI model, gets back a vector, and stores and indexes it for you. On query, your app sends plain text, Atlas embeds it with the very same model, runs the nearest neighbour search, and returns the ranked results. Voyage AI sits inside Atlas in both flows, so your application only ever deals in text, going in and coming out.
The only real change is in the index definition:
// Index the text field with AUTOMATED embedding.
//   type:"text" + model  ->  Atlas + Voyage AI embed for you.
var definition = new BsonDocument("fields", new BsonArray {
    new BsonDocument {
        { "type", "text" },
        { "path", "Description" },
        { "model", "voyage-3-large" },
        { "similarity", "cosine" } } });

await collection.SearchIndexes.CreateOneAsync(
    new CreateSearchIndexModel("auto_index",
        SearchIndexType.VectorSearch, definition));
This looks almost identical to the vector index from earlier, with one important difference. Instead of describing a pre-computed vector field, we set the field type to text and give it a model, here voyage-3-large. That single change is what tells Atlas to embed this field for us with Voyage AI. We point path at the text field we want searchable, the film Description, and pick a similarity function. Atlas then does the initial embedding of every existing document and keeps it in sync from then on.
Querying gets simpler too, and the interesting part is what is missing:
// Query with PLAIN TEXT.
//   no queryVector, no call to an embedding model.
var searchResults = await collection.Aggregate()
    .AppendStage<Movie>(new BsonDocument("$vectorSearch", new BsonDocument {
        { "index", "auto_index" },
        { "path", "Description" },
        { "query", "a young wizard faces a dark lord" },
        { "numCandidates", 100 },
        { "limit", 5 } }))
    .ToListAsync();
There is no queryVector and no call to an embedding model. We simply pass our search text in the query field, and Atlas embeds it for us before running the search. Because automated embedding is a newer capability there is no strongly typed helper for the text form yet, so we express the one stage directly with AppendStage, but it still reads cleanly. We point path at the same Description field and reference the auto_index we just created, and numCandidates and limit work exactly as before.
The effect is that both of our pipelines collapse. The Ollama step disappears from the ingest flow and from the query flow, because Atlas and Voyage AI handle the embedding in between. You store text, you query with text, and there is no separate embedding service for you to run, secure and scale.
Going further than the talk
Everything up to here is roughly what I covered in the lightning talk. I only had fifteen minutes, so I kept it to the core idea. What follows is really down to all of you who came along, because after I wrapped up there were some brilliant questions from the audience, and a fair few good chats afterwards over a drink too. A lot of those questions poked at exactly the practical stuff you run into the moment you try to build real search on top of this, rather than the neat happy path in a demo.
So I wanted to jot them all down here while they were fresh, partly so the people who asked have something to refer back to, and partly in case anyone else reading this was sitting there wondering the same thing but did not get the chance to put their hand up. None of this was in the talk itself, so treat it as bonus material, and honestly it is some of the most useful stuff, because it is the part that decides whether your search feels great or merely okay in production.
Reading the score
You might have noticed that SearchAsync pulls out a Score for every result, but I glossed over what that number actually means. When you use cosine similarity, Atlas normalises the score into a range of 0 to 1, where higher means more similar. A result up near 0.9 is a strong, confident match, whereas something down around 0.5 is only loosely related.
That is really useful, because it lets you set a threshold and simply drop weak matches:
var results = await repo.SearchAsync(queryEmbedding);
var good = results.Where(r => r.Score > 0.75).ToList();
Without a threshold, a vector search will always hand you back your limit number of results, even when nothing is genuinely relevant. It just returns the least bad options. So for a real search box, picking a sensible cut-off is often the difference between “spookily good” and “why on earth did it show me that”.
Filtering as well as searching
Here is where storing your data and your vectors together really pays off. A $vectorSearch can take a filter alongside the vector, so you can narrow the search to a subset of documents before it even looks at meaning. Say we only want Fantasy films:
var options = new VectorSearchOptions<Movie>
{
    IndexName = "vector_index",
    NumberOfCandidates = 100,
    Filter = Builders<Movie>.Filter.Eq(x => x.Genre, "Fantasy")
};

var results = await _collection.Aggregate()
    .VectorSearch(x => x.Embedding, queryEmbedding, limit: 5, options)
    .ToListAsync();
For that filter to work, you tell the index that Genre is filterable by adding it as a filter field in the index definition, right next to the vector field:
new BsonDocument { { "type", "filter" }, { "path", "Genre" } }
This is the payoff of the “one database” story from earlier. Your meaning based search and your ordinary metadata filters run in the same query, over the same documents, with no juggling between two systems. If you had bolted on a separate vector database, you would be filtering in one place and searching in another, then trying to reconcile the two.
Hybrid search: the best of both worlds
Right at the start I set keyword search and semantic search up as rivals, but in practice you do not have to pick one. The strongest real world search is usually a hybrid of the two. Keyword search is unbeatable when someone types an exact title, a product code, or a name, and semantic search shines when they describe what they mean. Run both and combine the results and you get the strengths of each.
MongoDB can do this for you with a $rankFusion stage, which runs a normal Atlas Search keyword query and a $vectorSearch side by side, then blends their rankings using reciprocal rank fusion. The idea is that a document ranking highly in both lists floats to the top:
// Conceptual shape: fuse a keyword search and a vector search
var pipeline = new BsonDocument("$rankFusion", new BsonDocument
{
    { "input", new BsonDocument("pipelines", new BsonDocument
        {
            { "keyword", new BsonArray { /* $search text query */ } },
            { "semantic", new BsonArray { /* $vectorSearch query */ } }
        })
    }
});
I have kept that deliberately loose, because the exact shape is worth reading up on in the docs, but the concept is the important bit. You stop treating “letters” and “meaning” as an either-or choice, and let each cover for the other’s blind spots. That fuzzy typo the vector search shrugs off, keyword catches. That synonym keyword misses, meaning finds.
More than one embedding per document
So far every movie has carried a single Embedding field, but nothing says a document is limited to one. You can happily store several vectors on the same document, each generated by a different model, and it is common to name the field after the model that produced it. So a single movie might carry both an Embedding_nomic and an Embedding_voyage3, sitting side by side.
Why would you want that? The big one is migrating to a newer model. Embedding models improve all the time, and a vector from one model is meaningless to another, so you cannot just swap models and keep your old vectors. Storing them side by side lets you move over gently. You add the new field, backfill it across your documents in the background, build a second vector index pointing at it, and only switch your queries across once everything is populated. There is no big-bang cutover and no window where search is broken, and if the new model turns out to be worse you can just point back at the old field.
The same trick gives you A/B testing for free. Because both vectors live on the document with their own indexes, you can run the same query against each model, show different users different results, and measure which one people actually click on. That is a far more honest way to choose a model than staring at benchmark numbers, because it tells you which one works best for your data and your users. Once you have a winner, you drop the loser’s field and its index and carry on.
Chunking your text first
One last practical note. In the demo, each film has a short one line description, so embedding the whole thing works fine. Real documents are rarely that tidy. Imagine that instead of one line summaries, we wanted to search across the full text of the Harry Potter books. If you try to embed an entire book, or even a whole chapter, in one go, you hit two problems. Models have a token limit, so very long text simply gets truncated and the back half of the chapter never makes it into the vector at all. And even when it does fit, squashing tens of thousands of words into a single vector blurs the meaning into a vague average. A vector for the whole of the Philosopher’s Stone would sit somewhere in the middle of “school”, “magic”, “friendship” and “danger”, so it would match a bit of everything and be brilliant at nothing.
The usual fix is chunking. You split a long document into smaller passages, embed every chunk separately, and store them as their own little documents pointing back at the parent book. At search time you match against the chunks, so a query like “the troll in the dungeon on Halloween” can land on the exact passage that describes that scene, rather than just telling you “the Philosopher’s Stone mentions it somewhere”.
The interesting question is how you slice it up, and this is where it stops being mechanical. The obvious approach is to chunk the Harry Potter books one page at a time, but that is often not the best choice. A scene frequently runs over a page boundary, so a strict per page split can cut a conversation or an action beat clean in half, and neither chunk then carries the full meaning of what happened. So people reach for slightly overlapping chunks instead, something like a page and a half at a time, or a full page plus the first paragraph of the next one. That overlap means a moment that straddles a boundary still appears whole in at least one chunk, so its meaning survives.
There is no single right answer here, and that is the important bit. The best chunk size depends entirely on your content and the kind of questions people ask. Dense reference material might want small, tightly focused chunks, whereas flowing narrative like a novel usually wants larger, overlapping ones so that context is not lost between passages. Chunk too small and each vector loses the surrounding context that gives it meaning. Chunk too large and you drift back towards that blurry average problem. Getting it right is genuinely a bit of trial and error. You try a strategy, run some real queries, see whether the results feel right, and adjust. Do not expect to nail it first time. This is the bread and butter of RAG, which I will come to in a second.
Where else semantic search shines
Searching movies is really just one shape of this technique. The same nearest neighbour idea powers a lot of the things you are probably being asked to build right now.
- RAG and chatbots grounded in your own data, where you use semantic search to find the most relevant pieces of your content and feed those to a large language model so its answers are grounded instead of made up.
- AI agent memory, where you embed past conversations and facts, then semantically recall the most relevant ones to give an agent long term memory.
- Recommendations and related content, which is really just “find me items similar to this one”.
- Deduplication and clustering of records, finding near duplicates even when the wording is different.
- Image and multimodal search, where you embed images instead of text and search by visual similarity.
- Anomaly detection, where points that sit far away from every normal cluster often indicate fraud or a quality problem worth flagging.
Key takeaways
Let me bring it all together with four things I would love you to walk away with:
- Search by meaning, not keywords. That is the whole mindset shift in a single line.
- Embeddings are the bridge from text to vectors that capture meaning.
- MongoDB lets you keep your data and your vectors in one place, and search across them with the tools you already use every day.
- If you are on Atlas, Voyage AI automated embeddings make this almost effortless, because Atlas does the embedding for you.
The main point I want to leave you with is this. You already know MongoDB, so adding AI powered search is a small step, not a whole new system to learn.
Thanks again to everyone who came along to the dotnetsheff talk. If you would like to talk through your own use case, come and grab me.